
Semantic segmentation with Vision Transformers, Hugging Face and TensorFlow#
Adapted from: https://keras.io/examples/vision/segformer/
Description: Fine-tuning a SegFormer model variant for semantic segmentation of geosptial data.
This tutorial demonstrates how to fine-tune a semantic segmentation architecture leveraging vision transformers on geospatial data to perform a land cover semantic segmentation task. Specifically, we will leverage a SegFormer model variant by fetching a version published to Hugging Face..
SegFormer is based on what is known as a “Mix Transformer” hierarchical architecture for the encoder, and a lightweight MLP and upsampler for its decoder. This design has led to state-of-the-art performance and efficiency for semantic segmentation (in terms of performance vs. model efficiency on the ADE20K benchmark dataset as of 2021). Newer architectures have since out-performed SegFormer on this benchmark dataset, however SegFormer’s ease of use with Hugging Face Transformers makes it a good candidate to implement in this tutorial.
More details on the SegFormer architecture can be found in its initial publication: SegFormer: Simple and Efficient Design for Semantic Segmentation with Transformers.

We will obtain a pre-trained SegFormer model from Hugging Face Transformers and fine-tune it using publicly available geospatial data and labels from Radiant Earth MLHub.
Note: this tutorial adapts some code from the following:
# install required libraries
!!pip install transformers==4.31.0
!pip install -q rasterio==1.3.8
!pip install -q geopandas==0.13.2
!pip install -q radiant_mlhub # for dataset access, see: https://mlhub.earth/
!pip install tensorflow_io==0.32.0
     ━━━━━━━━━━━━━━━━━━━━━━━━━━━━━━━━━━━━━━━━ 21.3/21.3 MB 35.7 MB/s eta 0:00:00
     ━━━━━━━━━━━━━━━━━━━━━━━━━━━━━━━━━━━━━━━━ 52.1/52.1 kB 1.0 MB/s eta 0:00:00
     ━━━━━━━━━━━━━━━━━━━━━━━━━━━━━━━━━━━━━━━━ 12.0/12.0 MB 24.7 MB/s eta 0:00:00
     ━━━━━━━━━━━━━━━━━━━━━━━━━━━━━━━━━━━━━━ 137.4/137.4 kB 10.7 MB/s eta 0:00:00
     ━━━━━━━━━━━━━━━━━━━━━━━━━━━━━━━━━━━━━━━━ 63.1/63.1 kB 7.1 MB/s eta 0:00:00
     ━━━━━━━━━━━━━━━━━━━━━━━━━━━━━━━━━━━━━━━━ 2.0/2.0 MB 27.4 MB/s eta 0:00:00
     ━━━━━━━━━━━━━━━━━━━━━━━━━━━━━━━━━━━━━━━━ 78.5/78.5 kB 5.8 MB/s eta 0:00:00
?25hERROR: pip's dependency resolver does not currently take into account all the packages that are installed. This behaviour is the source of the following dependency conflicts.
google-colab 1.0.0 requires requests==2.31.0, but you have requests 2.27.1 which is incompatible.
yfinance 0.2.27 requires requests>=2.31, but you have requests 2.27.1 which is incompatible.
Collecting tensorflow_io==0.32.0
  Downloading tensorflow_io-0.32.0-cp310-cp310-manylinux_2_12_x86_64.manylinux2010_x86_64.whl (28.0 MB)
     ━━━━━━━━━━━━━━━━━━━━━━━━━━━━━━━━━━━━━━━━ 28.0/28.0 MB 4.1 MB/s eta 0:00:00
?25hCollecting tensorflow-io-gcs-filesystem==0.32.0 (from tensorflow_io==0.32.0)
  Downloading tensorflow_io_gcs_filesystem-0.32.0-cp310-cp310-manylinux_2_12_x86_64.manylinux2010_x86_64.whl (2.4 MB)
     ━━━━━━━━━━━━━━━━━━━━━━━━━━━━━━━━━━━━━━━━ 2.4/2.4 MB 72.6 MB/s eta 0:00:00
?25hInstalling collected packages: tensorflow-io-gcs-filesystem, tensorflow_io
  Attempting uninstall: tensorflow-io-gcs-filesystem
    Found existing installation: tensorflow-io-gcs-filesystem 0.33.0
    Uninstalling tensorflow-io-gcs-filesystem-0.33.0:
      Successfully uninstalled tensorflow-io-gcs-filesystem-0.33.0
Successfully installed tensorflow-io-gcs-filesystem-0.32.0 tensorflow_io-0.32.0
import os, glob, tarfile, json
from pathlib import Path
from PIL import Image
import numpy as np
from radiant_mlhub import Dataset, Collection
import pandas as pd
from google.colab import drive
import tensorflow as tf
import tensorflow_io as tfio
from tensorflow.keras import backend
import rasterio
from skimage.transform import resize
from transformers import TFSegformerForSemanticSegmentation
Mount google drive to access our generated inputs and outputs.
# set your folders
if 'google.colab' in str(get_ipython()):
    # mount google drive
    drive.mount('/content/gdrive')
    processed_outputs_dir = '/content/gdrive/My Drive/tf-eo-devseed-2-processed-outputs/'
    user_outputs_dir = '/content/gdrive/My Drive/tf-eo-devseed-2-user_outputs_dir'
    if not os.path.exists(user_outputs_dir):
        os.makedirs(user_outputs_dir)
    print('Running on Colab')
else:
    processed_outputs_dir = os.path.abspath("./data/tf-eo-devseed-2-processed-outputs")
    user_outputs_dir = os.path.abspath('./tf-eo-devseed-2-user_outputs_dir')
    if not os.path.exists(user_outputs_dir):
        os.makedirs(user_outputs_dir)
        os.makedirs(processed_outputs_dir)
    print(f'Not running on Colab, data needs to be downloaded locally at {os.path.abspath(processed_outputs_dir)}')
Mounted at /content/gdrive
Running on Colab
# Flag for whether to use pre-processed outputs or generate your own
use_preprocessed_outputs = True
# Move to your user directory in order to write data, we comment this out so that we can train the model without an mlhub api key
#%cd $user_outputs_dir

# NOTE! If you want to use pre-processed outputs, uncomment the line below then skip the cells with topline comment "# Skip if using preprocessed outputs"
%cd $processed_outputs_dir
/content/gdrive/.shortcut-targets-by-id/1FrSTn9Iq458qQhTw_7rbaVSc739TTw9V/tf-eo-devseed-2-processed-outputs
Load the geosaptial data for fine-tuning#
We’ll use the LandCoverNet South America dataset for this example, which includes Sentinel-1, Sentinel-2 and Landsat 8 rasters and land cover labels. This is a tremendous amount of data so we will create and use, for demonstration purposes, a subset of true color (red, green, blue) Landsat 8 rasters. Outside of this demonstration, we encourage experimenting with the other raster datasets.
# configure Radiant Earth MLHub access, no need to do this if using pre-processed outputs
#!mlhub configure
# Check the available input data
# ds = Dataset.fetch('ref_landcovernet_sa_v1')
# for c in ds.collections:
#     print(c.id)
---------------------------------------------------------------------------
APIKeyNotFound                            Traceback (most recent call last)
<ipython-input-7-ca083c5dc9a7> in <cell line: 2>()
      1 # Check the available input data
----> 2 ds = Dataset.fetch('ref_landcovernet_sa_v1')
      3 for c in ds.collections:
      4     print(c.id)

/usr/local/lib/python3.10/dist-packages/radiant_mlhub/models/dataset.py in fetch(cls, dataset_id_or_doi, api_key, profile)
    237         """
    238         return cls(
--> 239             **client.get_dataset(dataset_id_or_doi, api_key=api_key, profile=profile),
    240             api_key=api_key,
    241             profile=profile,

/usr/local/lib/python3.10/dist-packages/radiant_mlhub/client/datasets.py in get_dataset(dataset_id_or_doi, api_key, profile)
    257         return get_dataset_by_doi(dataset_id_or_doi, api_key=api_key, profile=profile)
    258     else:
--> 259         return get_dataset_by_id(dataset_id_or_doi, api_key=api_key, profile=profile)
    260
    261

/usr/local/lib/python3.10/dist-packages/radiant_mlhub/client/datasets.py in get_dataset_by_id(dataset_id, api_key, profile)
    222     dataset : dict
    223     """
--> 224     session = get_session(api_key=api_key, profile=profile)
    225     try:
    226         return cast(Dict[str, Any], session.get(f'datasets/{dataset_id}').json())

/usr/local/lib/python3.10/dist-packages/radiant_mlhub/session.py in get_session(api_key, profile)
    263
    264     except APIKeyNotFound:
--> 265         raise APIKeyNotFound('Could not resolve an API key from arguments, the environment, or a config file.') from None

APIKeyNotFound: Could not resolve an API key from arguments, the environment, or a config file.
The next code block walks through the actual download of the input data from Radiant Earth using their Python API.
# Skip if using preprocessed outputs
# Get Radiant Earth dataset
collections = [
    'ref_landcovernet_sa_v1_source_landsat_8',
    'ref_landcovernet_sa_v1_labels'
]

def download(collection_id):
    print(f'Downloading {collection_id}...')
    collection = Collection.fetch(collection_id)
    path = collection.download('.')
    tar = tarfile.open(path, "r:gz")
    tar.extractall()
    tar.close()
    os.remove(path)

def resolve_path(base, path):
    return Path(os.path.join(base, path)).resolve()

def load_df(collection_id):
    collection = json.load(open(f'{collection_id}/collection.json', 'r'))
    rows = []
    item_links = []
    for link in collection['links']:
        if link['rel'] != 'item':
            continue
        item_links.append(link['href'])
    for item_link in item_links:
        item_path = f'{collection_id}/{item_link}'
        current_path = os.path.dirname(item_path)
        item = json.load(open(item_path, 'r'))
        tile_id = item['id'].split('_')[-1]
        for asset_key, asset in item['assets'].items():
            rows.append([
                tile_id,
                None,
                None,
                asset_key,
                str(resolve_path(current_path, asset['href']))
            ])

        for link in item['links']:
            if link['rel'] != 'source':
                continue
            link_path = resolve_path(current_path, link['href'])
            source_path = os.path.dirname(link_path)
            try:
                source_item = json.load(open(link_path, 'r'))
            except FileNotFoundError:
                continue
            datetime = source_item['properties']['datetime']
            satellite_platform = source_item['collection'].split('_')[-1]
            for asset_key, asset in source_item['assets'].items():
                rows.append([
                    tile_id,
                    datetime,
                    satellite_platform,
                    asset_key,
                    str(resolve_path(source_path, asset['href']))
                ])
    return pd.DataFrame(rows, columns=['tile_id', 'datetime', 'satellite_platform', 'asset', 'file_path'])

if use_preprocessed_outputs==True:
    print("Using pre-processed outputs")
else:
    print("Using pre-processed outputs")
    for c in collections:
        download(c)
    #df = load_df('ref_landcovernet_sa_v1_labels')
Pre-process the data for SegFormer#
For preparing the datasets for training and evaluation, we:
Partition the data into training, validation and testing sets.
Generate true color (red, green, blue) images from the Landsat 8 input data.
Resize the image tiles from 256x256 to 512x512 for use with the SegFormer model variant.
Normalize the images with the mean and standard deviation used during pre-training SegFormer.
Obtain the image labels with integer class values.
Save the preprocess results to a local directory
AUTO = tf.data.AUTOTUNE
BATCH_SIZE = 4
image_size = 512
mean = tf.constant([0.485, 0.456, 0.406])
std = tf.constant([0.229, 0.224, 0.225])
if use_preprocessed_outputs==True:
    print("Using pre-processed outputs")
else:
    # Gather all samples from the Landsat 8 dataset. Each subdirectory points to a single sample.
    p = Path('ref_landcovernet_sa_v1_source_landsat_8/')
    subdirs = [f for f in p.iterdir() if f.is_dir()]
    print(len(subdirs)) # Number of samples. Should be 34229.
Using pre-processed outputs
# Function for running some of the preprocessing steps
def compile_dataset(impath, dataset_split):
  # Create partition directories
  dirs = [f"ref_landcovernet_sa_v1_rgb_images_png_512_{dataset_split}",  f"ref_landcovernet_sa_v1_label_images_png_512_{dataset_split}"]
  for d in dirs:
    if not os.path.exists(d):
      os.makedirs(d)
  # Generate true color (red, green, blue) images from the Landsat 8 input data.
  r = rasterio.open(f"{impath}/B04.tif").read().transpose(1,2,0)
  g = rasterio.open(f"{impath}/B03.tif").read().transpose(1,2,0)
  b = rasterio.open(f"{impath}/B02.tif").read().transpose(1,2,0)
  rgb = (np.dstack((r,g,b)) * 255.999) .astype(np.uint8)
  # Resize the image tiles from 256x256 to 512x512 for use with the SegFormer model variant.
  resized_rgb_image = resize(rgb, (image_size, image_size), order=0, preserve_range=True, anti_aliasing=False) #.astype('uint8')
  rgb_im = Image.fromarray(resized_rgb_image)
  im_id = impath.split('/')[1]
  rgb_im.save(f"ref_landcovernet_sa_v1_rgb_images_png_512_{dataset_split}/{im_id}.png", "PNG")
  #tiff.imsave(f"ref_landcovernet_sa_v1_rgb_images_fl_t_{dataset_split}/{im_id}.tif", rgb) #resized_rgb_image)
  maskpath = impath.replace("source_landsat_8", "labels")
  maskpath = maskpath[:-9]
  mask_file = f"{maskpath}/labels.tif"
  mask_image = rasterio.open(f"{mask_file}").read().transpose(1,2,0)
  # Obtain the image labels with integer class values.
  mask_image = mask_image[:, :, 0]
  resized_mask_image = resize(mask_image, (image_size, image_size), order=0, preserve_range=True, anti_aliasing=False).astype('uint8')
  mask_image = Image.fromarray(resized_mask_image)
  mask_image.save(f"ref_landcovernet_sa_v1_label_images_png_512_{dataset_split}/{im_id}.png", "PNG")
Partition the data#
Because we have 34229 data points to work with, let’s just practice on a subset.
1000 samples for training to start
200 for validation
1000 for testing
def partition(part_string, part_start, part_end):
  i = 0
  for s in subdirs[part_start:part_end]:
    compile_dataset(str(s), part_string)
    i = i+1
  return
if use_preprocessed_outputs==True:
    print("Using pre-processed outputs")
else:
    # Partition the dataset
    partition("train", 0, 1000)
    partition("val", 1001, 1201)
    partition("test", 1202, 2202)
Using pre-processed outputs
Build the dataloader for each partition#
We now use the above utilities to prepare dataset objects including
prefetch() for performance.
Now that the data has been partitioned, we will compile the splits into tf.data.Datasets using prefetch() for efficiency (read more on this method here).
def normalize(input_image):
  # Normalize to mean values used in SegFormer pretraining
  input_image = tf.image.convert_image_dtype(input_image, tf.float32)
  input_image = (input_image - mean) / tf.maximum(std, backend.epsilon())
  return input_image


def load(image_file, mask_file):
  # Load images and labels as tensors
  image = tf.io.read_file(image_file)
  #image = tfio.experimental.image.decode_tiff(image)
  image = tf.io.decode_png(image)

  mask = tf.io.read_file(mask_file)
  mask = tf.io.decode_png(mask)

  input_image = tf.cast(image, tf.float32)
  mask_image = tf.cast(mask, tf.float32)


  input_image = tf.image.resize(input_image, (image_size, image_size))
  input_mask = tf.image.resize(
        mask_image,
        (image_size, image_size),
        method="nearest",
        antialias=False,
  )

  input_image = normalize(input_image)
  # Transpose image to channels first format
  input_image = tf.transpose(input_image, (2, 0, 1))
  reshaped_input_mask = tf.reshape(input_mask, (512, 512, 1))
  return {"pixel_values": input_image, "labels": tf.squeeze(reshaped_input_mask)}


train_images = glob.glob('ref_landcovernet_sa_v1_rgb_images_png_512_train//*.*')
train_labels = glob.glob('ref_landcovernet_sa_v1_label_images_png_512_train//*.*')
train_ds = tf.data.Dataset.from_tensor_slices((train_images, train_labels))

val_images = glob.glob('ref_landcovernet_sa_v1_rgb_images_png_512_val//*.*')
val_labels = glob.glob('ref_landcovernet_sa_v1_label_images_png_512_val//*.*')
val_ds = tf.data.Dataset.from_tensor_slices((val_images, val_labels))

test_images = glob.glob('ref_landcovernet_sa_v1_rgb_images_png_512_test//*.*')
test_labels = glob.glob('ref_landcovernet_sa_v1_label_images_png_512_test//*.*')
test_ds = tf.data.Dataset.from_tensor_slices((test_images, test_labels))

train_ds = (
    train_ds
    .map(load, num_parallel_calls=AUTO)
    .batch(BATCH_SIZE)
    .prefetch(AUTO)
    )


val_ds = (
    val_ds
    .map(load, num_parallel_calls=AUTO)
    .batch(BATCH_SIZE)
    .prefetch(AUTO)
    )


test_ds = (
    test_ds
    .map(load, num_parallel_calls=AUTO)
    .batch(BATCH_SIZE)
    .prefetch(AUTO)
    )
It’s useful to inspect the shapes of the input images and segmentation masks.
print(train_ds.element_spec)
{'pixel_values': TensorSpec(shape=(None, 3, 512, 512), dtype=tf.float32, name=None), 'labels': TensorSpec(shape=(None, 512, 512), dtype=tf.float32, name=None)}
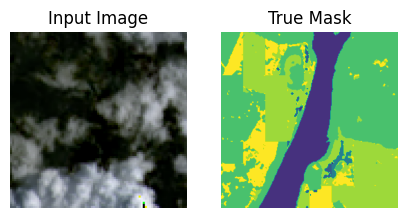
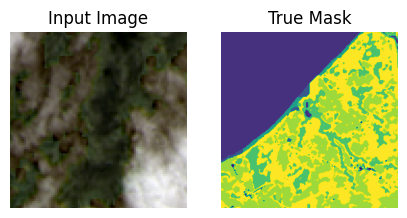
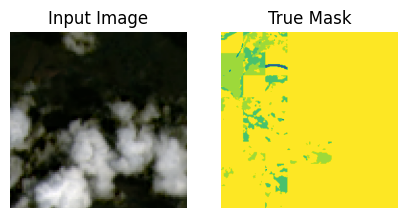
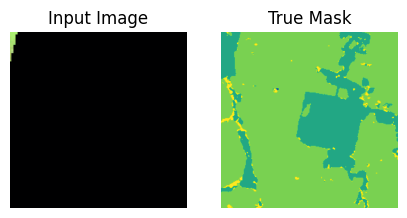
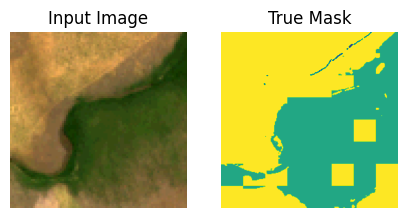
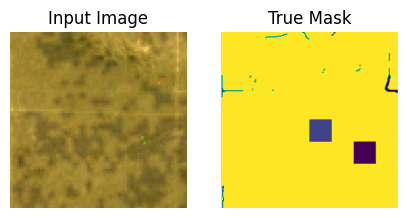
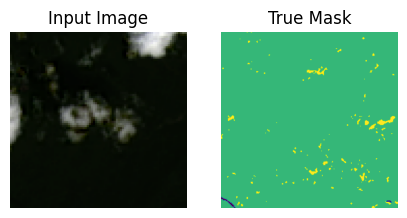
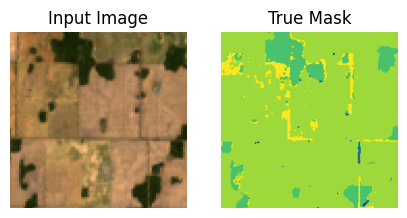
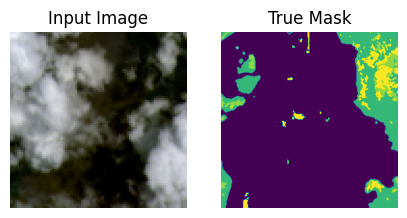
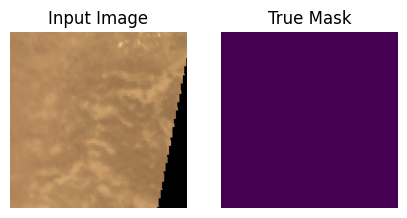
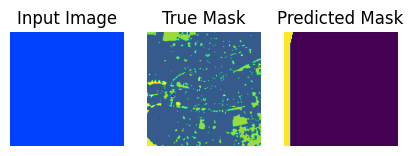
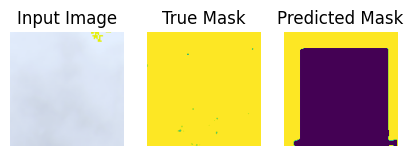
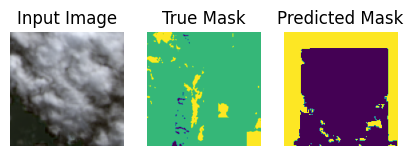
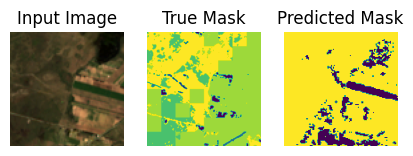
Visualize the dataset#
It’s also nice to get a visual depiction of the processed samples
import matplotlib.pyplot as plt


def display(display_list):
    plt.figure(figsize=(5, 5))

    title = ["Input Image", "True Mask", "Predicted Mask"]

    for i in range(len(display_list)):
        plt.subplot(1, len(display_list), i + 1)
        plt.title(title[i])
        plt.imshow(tf.keras.utils.array_to_img(display_list[i]))
        plt.axis("off")
    plt.show()


for samples in train_ds.take(10):
    sample_image, sample_mask = samples["pixel_values"][0], samples["labels"][0]
    #print(sample_image.shape, sample_mask.shape)
    sample_image = tf.transpose(sample_image, (1, 2, 0))
    sample_mask = tf.expand_dims(sample_mask, -1)
    #print(sample_image.shape, sample_mask.shape, tf.unique(tf.reshape(sample_mask,[-1])))
    display([sample_image, sample_mask])
Load a pretrained SegFormer checkpoint from Hugging Face#
Now, we will select a pretrained SegFormer model variant and load it from Hugging Face Transformers. There are several SegFormer model variants, i.e. MiT-B0 and MiT-B5. The checkpoints for all can be accessed here. For this tutorial, we are loading the smallest variant, Mix-B0, which suffices to show its use and offers a nice balance between inference speed and accuracy performance.
What is Hugging Face?#
There are a couple of popular options for fetching CNN, RNN, Transformer, and other kinds of deep learning models for Keras and Tensorflow. Each has it’s pros, cons, and varying degrees of maintenance and support:
Huggingface Models is the largest hub of open source models across all ML frameworks. There are over 1000 Keras models available for download. However, most of the community that uses Huggingface publishes their models in Pytorch (there are over 100,000 Pytorch models). Some of these models are published by the community and are unreviewed, meaning they may be more or less maintained. There are over 100 models released by the Keras team: https://huggingface.co/keras-io.
Tensorflow Image Models is a project maintained by an individual open source contributor, Martins Bruveris, a staff applied scientist at Onfido. Available models are listed here, and are sourced from the original paper implementations. The available models come from fundamental developments in deep learning, and include models such as ResNet, a CNN that efficiently learns features using residual connection, allowing for deeper networks, and more recent models like Pyramid Vison Transformer. Each model is profiled for GPU memory requirements and image throughput, a measure of training speed.
Keras Applications is maintained by the Keras Team. It hosts a selection of important models with benchmarks, and unique features such as being able to load models with built in image preprocessing to work with Channel first or Channel last formatted inputs. While it does not support transformer based models, it supports ConvNeXt a CNN-based architecture engineered with inspiration from vision transformers that competes favorably with recent vision transformers like SWIN Transformer.
We’ll use Hugging Face to demo fetching, loading, and comparing model inferences since Hugging Face has the easiest to use and most well supported API for fetching and using deep learning models. Furthermore, many models published by the Keras Team contain corresponding jupyter notebook tutorials demonstrating their use in detail.
model_checkpoint = "nvidia/mit-b0"

# Classes below derived from https://radiantearth.blob.core.windows.net/mlhub/landcovernet_sa/Documentation.pdf

id2label = {0: "Background", 1: "water", 2: "artificial_bare_ground", 3: "natural_bare_ground", 4: "permanent_snow_ice", 5: "woody_vegetation", 6: "cultivated_vegetation", 7: "semi_natural_vegetation"}
label2id = {label: id for id, label in id2label.items()}
num_labels = len(id2label)
model = TFSegformerForSemanticSegmentation.from_pretrained(
    model_checkpoint,
    num_labels=num_labels,
    id2label=id2label,
    label2id=label2id,
    ignore_mismatched_sizes=True,
)
WARNING:tensorflow:5 out of the last 5 calls to <function Conv._jit_compiled_convolution_op at 0x7a3feff48dc0> triggered tf.function retracing. Tracing is expensive and the excessive number of tracings could be due to (1) creating @tf.function repeatedly in a loop, (2) passing tensors with different shapes, (3) passing Python objects instead of tensors. For (1), please define your @tf.function outside of the loop. For (2), @tf.function has reduce_retracing=True option that can avoid unnecessary retracing. For (3), please refer to https://www.tensorflow.org/guide/function#controlling_retracing and https://www.tensorflow.org/api_docs/python/tf/function for  more details.
WARNING:tensorflow:6 out of the last 6 calls to <function Conv._jit_compiled_convolution_op at 0x7a3feff4a680> triggered tf.function retracing. Tracing is expensive and the excessive number of tracings could be due to (1) creating @tf.function repeatedly in a loop, (2) passing tensors with different shapes, (3) passing Python objects instead of tensors. For (1), please define your @tf.function outside of the loop. For (2), @tf.function has reduce_retracing=True option that can avoid unnecessary retracing. For (3), please refer to https://www.tensorflow.org/guide/function#controlling_retracing and https://www.tensorflow.org/api_docs/python/tf/function for  more details.
Some layers from the model checkpoint at nvidia/mit-b0 were not used when initializing TFSegformerForSemanticSegmentation: ['classifier']
- This IS expected if you are initializing TFSegformerForSemanticSegmentation from the checkpoint of a model trained on another task or with another architecture (e.g. initializing a BertForSequenceClassification model from a BertForPreTraining model).
- This IS NOT expected if you are initializing TFSegformerForSemanticSegmentation from the checkpoint of a model that you expect to be exactly identical (initializing a BertForSequenceClassification model from a BertForSequenceClassification model).
Some layers of TFSegformerForSemanticSegmentation were not initialized from the model checkpoint at nvidia/mit-b0 and are newly initialized: ['decode_head']
You should probably TRAIN this model on a down-stream task to be able to use it for predictions and inference.
You might see a warning that states some weights are not initialized and new ones are being created. That’s totally normal as we are finetuning this model with a custom dataset with a different class schema than the dataset used for pre-training.
TFSegformerForSemanticSegmentation
attaches a unique decoder head for our custom dataset using associated parameters.
Compile the model#
Now we will compile the model, whilst selecting our optimizer and learning rate.
lr = 0.001
optimizer = tf.keras.optimizers.Adam(learning_rate=lr)
model.compile(optimizer=optimizer)
Of note, you’ll see that no loss function is defined. Reason being, the forward pass of the SegFormer network implements loss computation on the labels and images provided as input. From that, the model returns a structured dataclass object that is in turn used to pilot the model during training.
Now that the model is compiled, we will add a few callbacks to monitor information during training, and then we will execute model training with the fit() method.
Prediction callback to monitor training progress#
This callback enables us to visualize interim predictive progress of the model during training. It is inspired from this tutorial.
from IPython.display import clear_output


def create_mask(pred_mask):
    pred_mask = tf.math.argmax(pred_mask, axis=1)
    pred_mask = tf.expand_dims(pred_mask, -1)
    return pred_mask[0]


def show_predictions(dataset=None, num=1):
    if dataset:
        for sample in dataset.take(num):
            images, masks = sample["pixel_values"], sample["labels"]
            masks = tf.expand_dims(masks, -1)
            pred_masks = model.predict(images).logits
            images = tf.transpose(images, (0, 2, 3, 1))
            display([images[0], masks[0], create_mask(pred_masks)])
    else:
        display(
            [
                sample_image,
                sample_mask,
                create_mask(model.predict(tf.expand_dims(sample_image, 0))),
            ]
        )


class DisplayCallback(tf.keras.callbacks.Callback):
    def __init__(self, dataset, **kwargs):
        super().__init__(**kwargs)
        self.dataset = dataset

    def on_epoch_end(self, epoch, logs=None):
        clear_output(wait=True)
        show_predictions(self.dataset)
        print("\nSample Prediction after epoch {}\n".format(epoch + 1))
Train model#
model.fit??
# Increase the number of epochs if the results are not of expected quality.
EPOCHS = 1

history = model.fit(
    train_ds,
    validation_data=test_ds,
    # callbacks=[DisplayCallback(val_ds)],
    epochs=EPOCHS,
    steps_per_epoch=15,
    validation_steps=15,
    use_multiprocessing=True
)
15/15 [==============================] - 7s 487ms/step - loss: 1.5403 - val_loss: 1.7536
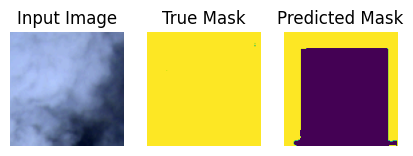
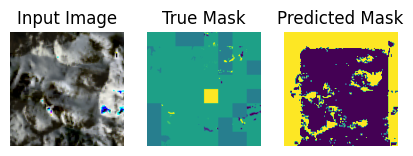
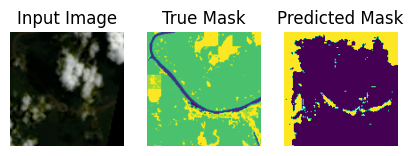
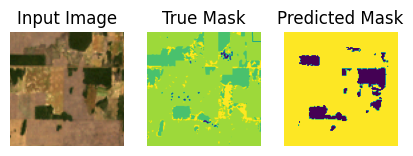
Inference#
Let’s use the finetuned model to predict generate some predictions from the test set.
show_predictions(test_ds, 10)
1/1 [==============================] - 4s 4s/step
1/1 [==============================] - 0s 110ms/step
1/1 [==============================] - 0s 119ms/step

1/1 [==============================] - 0s 123ms/step
1/1 [==============================] - 0s 115ms/step
1/1 [==============================] - 0s 106ms/step

1/1 [==============================] - 0s 112ms/step
1/1 [==============================] - 0s 114ms/step
1/1 [==============================] - 0s 98ms/step
1/1 [==============================] - 0s 96ms/step
Conclusion#
This was a brief introduction to the use of vision transformers by way of the SegFormer architecture for use in a custom semantic segmentation task.
In further experimentation, you are encouraged to:
Add data augmentation into the pre-processing to explore how that affects model accuracy and robustness.
Load and finetune from a larger SegFormer model checkpoint.
Share the fine-tuned model to the Hugging Face Hub for others to try out. This can be done through
model.push_to_hub("your-username/your-awesome-model"). Then, you can load the model byTFSegformerForSemanticSegmentation.from_pretrained("your-username/your-awesome-model"). An end-to-end example of this is here.There is also a callback that allows for you to push the model checkpoints to the Hugging Face Hub whilst the model is being fine-tuned. It is the
PushToHubCallbackKeras callback. An example is here and here is an example usage of this callback.