
What are cloud providers? Why might I need them for ML and Earth observation data?#
The three big cloud providers, Amazon Web Services, Microsoft Azure, and Google Cloud Platform, each provide three general services that can be essential when developing machine learning models and services on top of geospatial imagery:
data warehouses containing many popular satellite, climate, weather, and other geospatial data archives
the ability to rent computers with GPUs (graphical processing units), which can train machine learning models 10x-1000x faster than CPUs
the ability to rent higher level computational services.
Example 1: AWS Batch can perform batch processing (spinning up many machines to process lots of data).
Example 2: Google Cloud Functions allow you to run code without managing servers (their lifecycle, starting them up and shutting them off, or the machine type). This paradigm of computing is called “Serverless”, and allows you to execute code that scales by demand, in an event-driven way. Typically, this is pay-per-use.

Fig. 24 Figure from https://www.fastmetrics.com/blog/tech/what-is-cloud-computing/#
We typically need GPUs to train machine learning models. Because they are computationally intensive, we rely on GPUs to run training experiments in a reasonable amount of time (minutes instead of hours, or hours instead of days).
Because IO (Input/Output) operations can take up a lot of time when training models or running model inference, it helps to run the compute next to the data. this means using cloud data storage directly rather than downloading files to another machine.
Finally, if we want to build complex, event-driven services that use machine learning, cloud-based services are typically the easiest, most reproducible, most fault-tolerant, and most scalable way to build these services.
What is Google Cloud Platform? How is it different from Google Colab?#
Google Cloud Platform (GCP) is a suite of cloud services including computing, data storage, data analytics and more. For a machine learning engineer looking to develop ML models on large geospatial datasets and integrate those models into applications for monitoring and detection, the following GCP services would be particularly useful:
Compute Engine: Infrastructure as a Service (IaaS) providing VMs. This is suitable for running geospatial data processing or analysis tasks that require significant compute resources. It has the capability to provision machine types with varying amounts of GPU and CPU computing power as well as RAM and disk space.
Cloud Storage: Object storage for keeping data, such as geospatial datasets, model checkpoints, and training data. It supports different storage classes (like multi-regional, regional, nearline, coldline) to optimize cost. The main receptacle for storing data in Cloud Storage is called a “bucket”.
Cloud Functions: Serverless compute service to run single-purpose code in response to events. This can be useful for smaller, event-driven tasks, like notifying an application that a new satellite image is ready for processing when it is placed in a Google Cloud Storage bucket. Supports limited runtimes provided by Google for Node.js, Python, Go, Java, .NET, Ruby, and PHP.
Cloud Run: A service to deploy containerized applications. This means you can package and deploy your application, which might comprise multiple functions or endpoints, regardless of the language or dependencies and run it on Cloud Run.
IAM & Security: Ensures that your data and services are secure. Given the sensitivity of some geospatial data, understanding and implementing correct access controls is crucial.
In addition, the following services may be useful alternatives setting up Cloud Functions or Compute Engine VMs directly. These may have added costs, harder to inspect costs, and may be less customizable for a particular application:
Kubernetes Engine (GKE): Managed Kubernetes service for deploying, managing, and scaling containerized applications. This can be useful for deploying machine learning models as microservices and potentially cheaper than using Google’s managed platform, Vertex AI.
Vertex AI (previously “AI Platform”): A managed service for training and deploying ML models at scale.
It comes with pre-installed Python environments with multiple ML frameworks such as TensorFlow, scikit-learn, and XGBoost. It also provides GPU and TPU support to accelerate training.
It also allows for deployment of trained machine learning models for making predictions via web requests or batch jobs. It can expose your trained model as a RESTful API, which can be consumed by other applications.
See these guides for examples of using GEE + Vertex AI: https://developers.google.com/earth-engine/guides/ml_examples
We have a preexisting Google Cloud project for the ACCA team. We’ll use this to demo deploying a Machine Learning workstation with Terraform, which will let us start a Jupyter Notebook on a Compute Engine instance type of our choice, with as many GPUs, RAM, and disk space as we want that is supported by the instance type selection. These can be payed for with your preferred payment method or cloud credits if you have access to cloud credits via a partnership with a Google Affiliated program.
Deploying Cloud Functions and Cloud Run for ML Inference with Pulumi#
Let’s walk through an example application that mainly relies on two Google Cloud Platform services: Cloud Run and Cloud Functions.
The Project: Client X wants to build a monitoring service for landslides on top of Sentinel-1 imagery. This imagery lives in Amazon Web Services, but they need to develop their application in Google Cloud Platform because this is their preferred cloud. The service should have the following features:
Every time a new Sentinel-1 scene becomes available, we check that the scene is relevant. For landslides, this service could check that the scene is not completely over water and has high enough slopes for landslides.
If the scene is relevant, a model makes segment predictions on the image where a landslide occurred, mapping the extent of the damage.
The results of the model prediction are stored in a GIS database as polygons.
The GIS database is hooked up to a service that can distribute the model prediction results to users and other applications
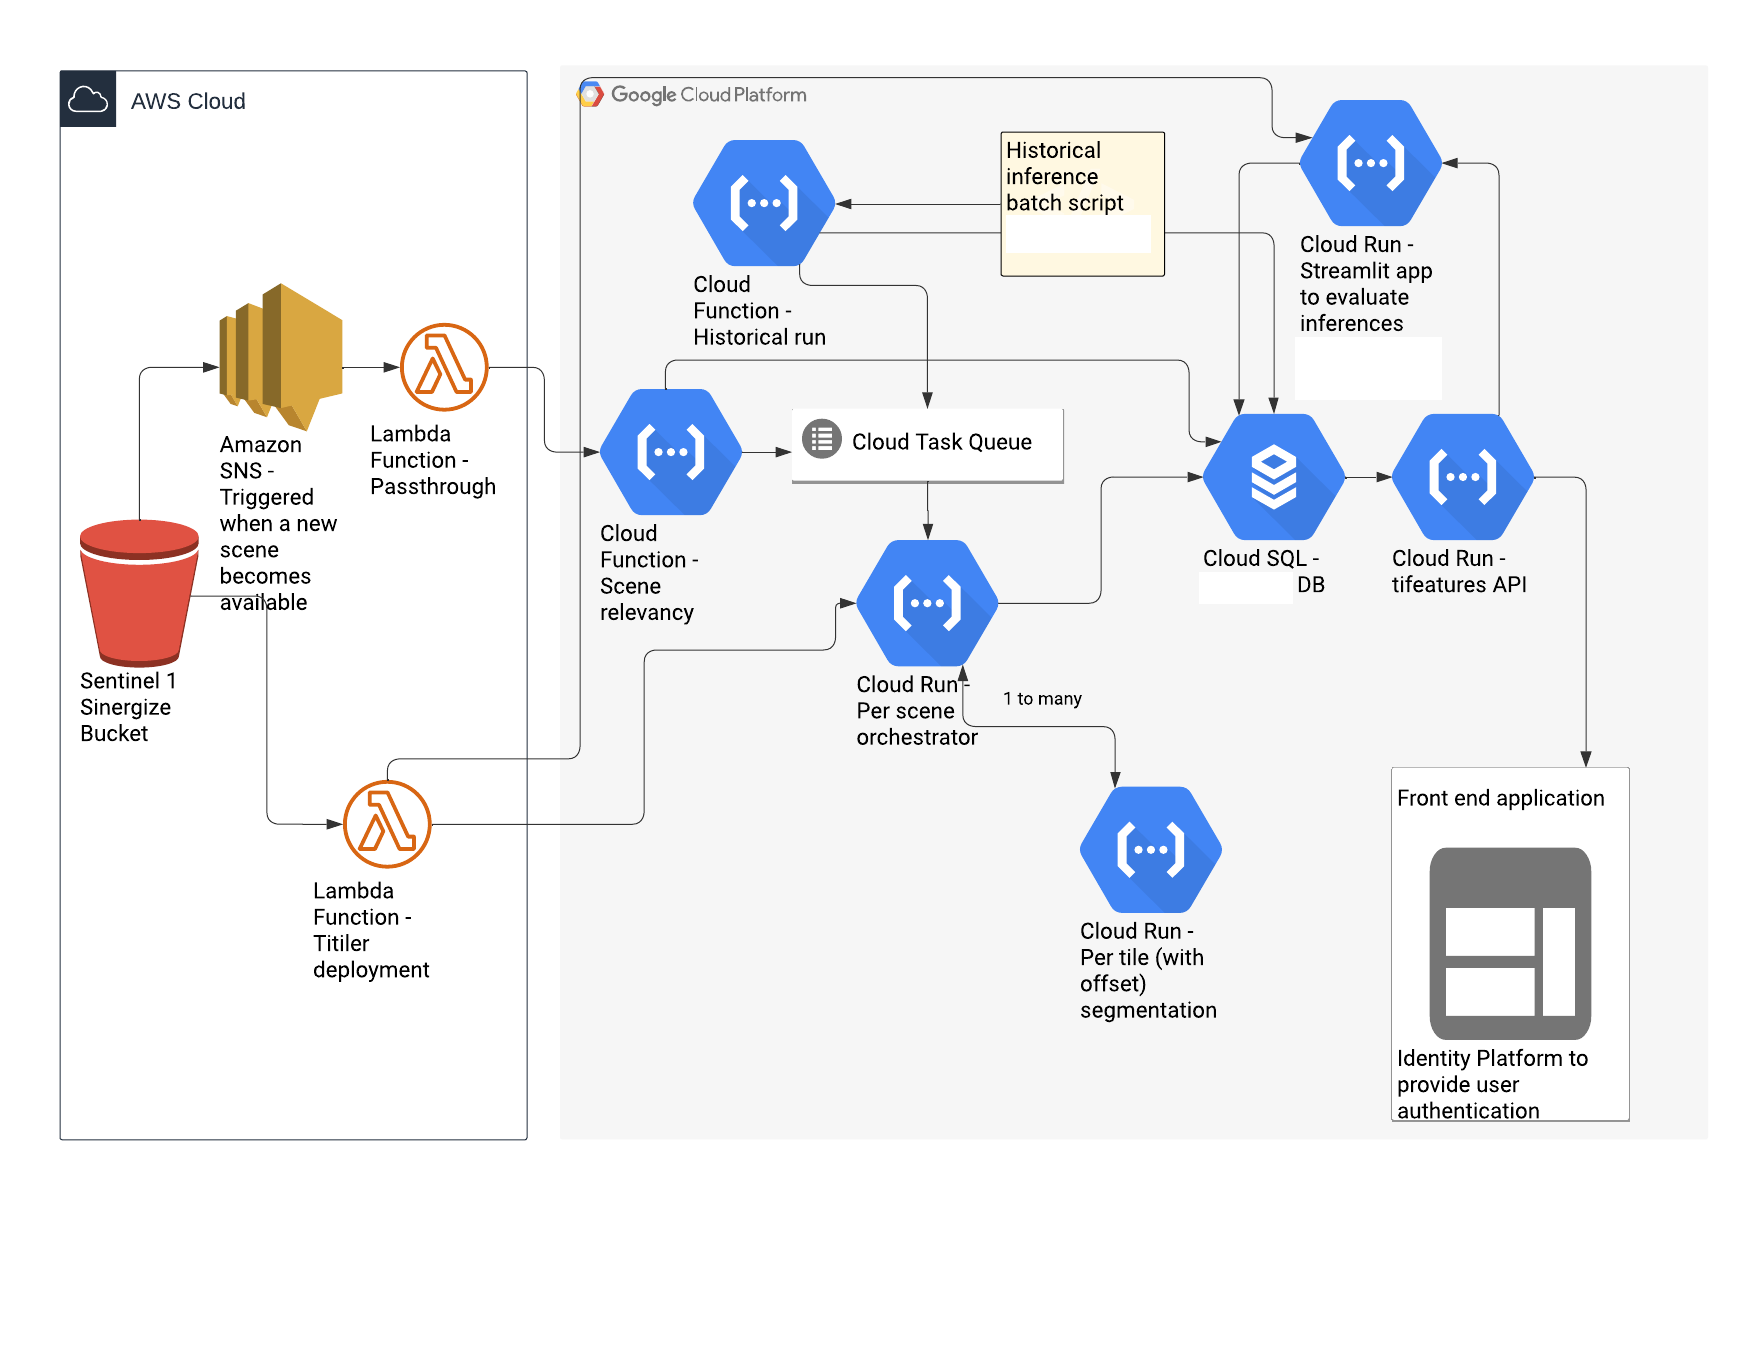
The above diagram describes an example service. Here, we divide our architecture between services that are best placed next to the original data source in AWS for cost reasons. These include an SNS Trigger that notifies when a new scene is available and Lambda functions for serving satellite images to the GCP services.
In GCP, we primarily use Cloud Functions for simple, single function operations, like looking up if a satellite image is over land and has high slope, and for optionally running inference on the historical archive of satellite scenes. For real-time processing, we use Cloud Run to orchestrate ML inference, which involves chipping our satellite image into tiles that can fit in memory for making predictions, merging predictions, georeferencing predictions, and passing scene and prediction metadata to a database. The GIS database using PostGIS is deployed with GCP Cloud SQL, and is connected to another Cloud Run service that exposes the database to users with a standard tifeatures geospatial API so that requests can be made, such as subsetting model predictions by a bounding box.
Finally, we use GCP Identity Platform to handle user account authentication when logging in to the frontend application, which also uses the tifeatures API.
What’s notable about this infrastructure is that it is event driven. We only spin up these resources when the SNS trigger notifies the GCP resources that there is a new satellite scene to process. This helps keep costs low, ensuring we aren’t paying for idle machines.
How do you deploy all of this?#
We can use infrastracture-as-code tools to write down the resources we would like to deploy in a programming language, and then execute that plan to deploy the cloud resources, stop them, or terminate them entirely.
One tool we can use is Pulumi, which has a Python API that allows you to write in a Jupyter Notebook or python file how you would like to deploy complex applications in Google Cloud Platform, Amazon Web Services, or Microsoft Azure.
gcp_pulumi_stack/ contains pulumi files that define the infrastracture to be deployed in order to illustrate what it looks like to deploy the above resources. This code is not executable, but serves as an example for how to define the above resources.
Deploying a ML Workstation with Terraform#
Before we can deploy a ML model on Google Cloud Platform, we have to train it first! Nowadays, most ML model development happens on the cloud on rented GPUs. The benefits of doing so are:
We can be flexible with the compute infrastructure we need, scaling up to many GPUs when we need to churn through lots of data, or selecting small, cheap GPUs when running less data hungry experiments.
A ML workstation on the cloud can be accessed from anywhere, and it is relatively painless to set up the networking yourself, even if you aren’t a cloud pro.
It helps to have the compute next to the cloud hosted data.
Having compute next to the data makes the computation go faster. We can exert fine-grained control the IO connection between the GPU, CPU, and disk space.
Working from public cloud hosted data makes research more reproducible since we don’t need to rely on hard coded, user-specific file paths.
And finally, we have more control over how we interact with our ML workstation and what user interface and ML dependencies we can install and how we can install them.
In particular, we can use docker for containerized environments, whereas Google Colab does not support this.
While Google Colab is a great tool for demos, learning, and running small experiments with small datasets, it’s dependency on Google Drive as a storage backend limits it’s performance, makes it more difficult to collaborate, and more difficult to customize your ML workstation environment.
Below, we’ll show how to deploy your own ML workstation with a cheap T4 GPU. See the gcpvm/README.md for detailed instructions on how to set up and connect to the workstation with Jupyter Lab and VSCode. We’ll go over this in a demo!
GCloud Terminal CLI Setup Instructions#
Install Google Cloud SDK: If you haven’t installed the Google Cloud SDK on your machine, you can download and install it from the official Google Cloud website: https://cloud.google.com/sdk/docs/install. Then, accept the arguments with “Y” that append the CLI commands to your terminal configuration file, like your
~/.bashrcor~/.zshrcfileInitialize gcloud: After installing the SDK, open your terminal (command prompt) and run the following command to initialize gcloud:
gcloud init
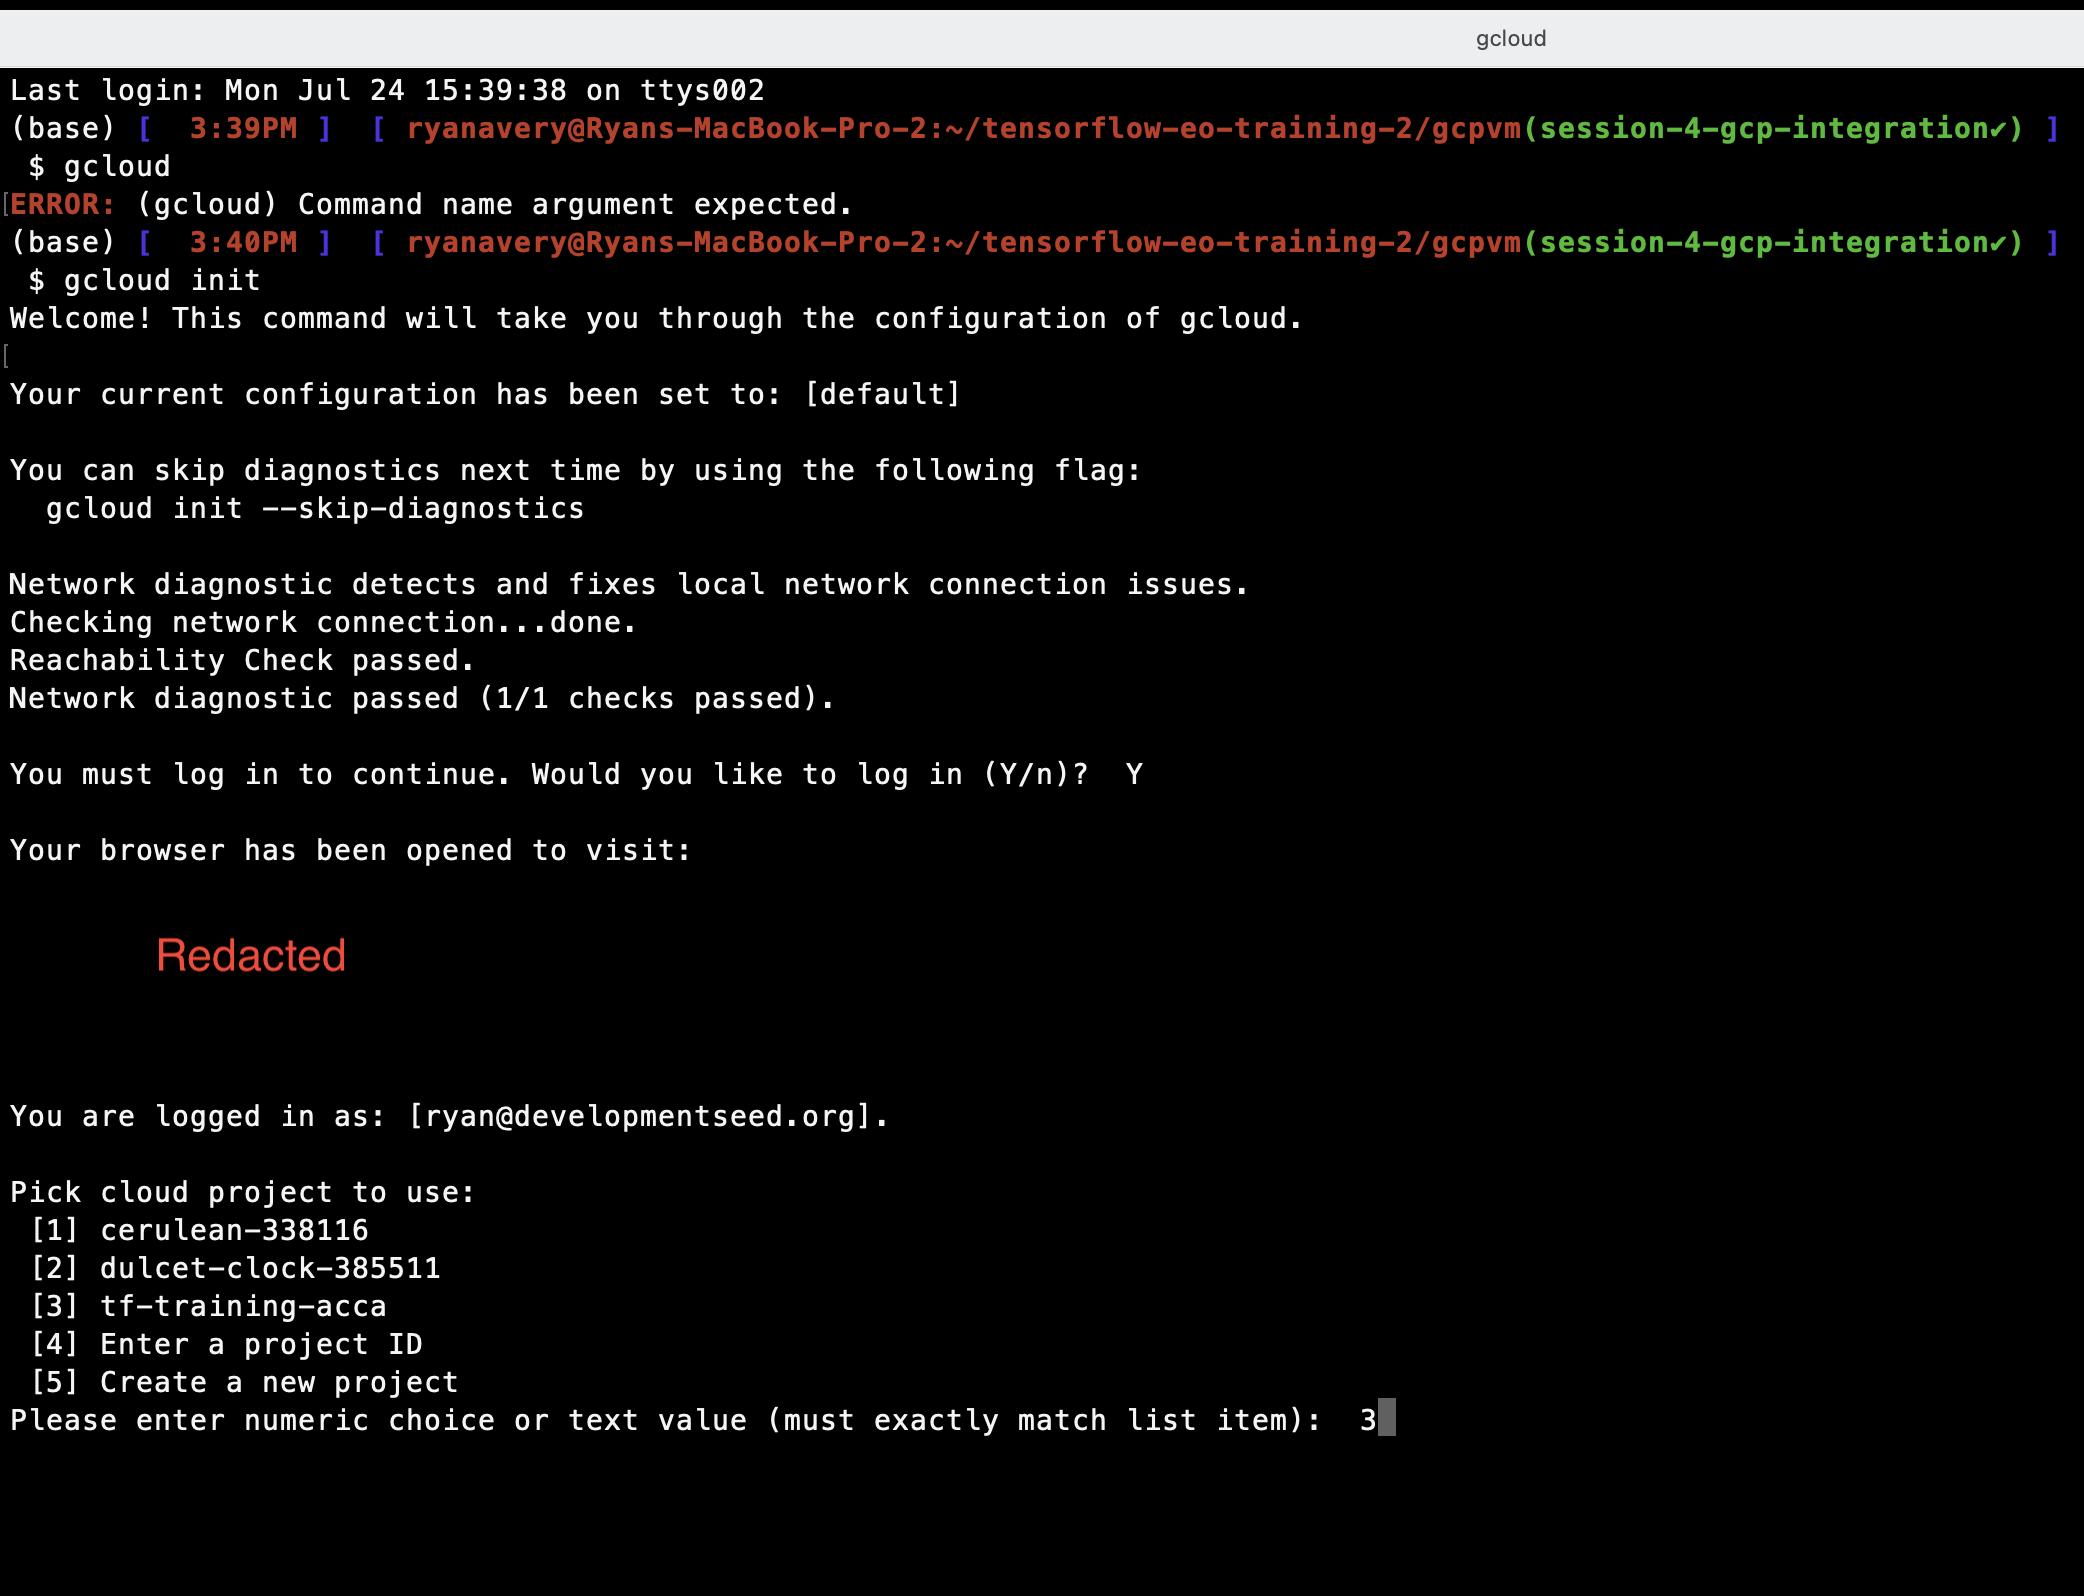
Login with your Google Account: The above command will prompt you to log in to your Google Account in your web browser. Click on the provided link, sign in with your Google Account, and authorize the SDK to access your Google Cloud resources.
Select a project: If you have multiple projects associated with your Google Account, you’ll be asked to choose the project you want to use. The list of projects will be displayed in the terminal, and you can select the appropriate project by typing the corresponding number.
Set default configuration (optional): After selecting the project, you can choose to set it as the default configuration by typing “Y” when prompted. This will make it the default project for future gcloud commands.
Configuration completion: Once the configuration is complete, you’ll receive a message confirming that you are now authenticated and set up to use the selected Google Cloud project.
Terraform Setup Instructions#
Install terraform following these instructions: https://developer.hashicorp.com/terraform/tutorials/aws-get-started/install-cli You can skip the Quickstart tutorial
Navigate to the
gcpvm/folder in this repository: All commands for controlling the VM must be run from thegcpvm/folder.Run
terraform initto initialize terraform and download the correct versions of libraries used to create the Google Cloud resources.Run
gcloud auth application-default loginto authenticate terraform to use the gcloud CLI to provision resources. 1.. For new projects, you may need to enable Compute Engine by visiting https://console.developers.google.com/apis/api/compute.googleapis.com/overview?project=161564225007 and clicking “Enable”.Run
terraform applyto create the VM.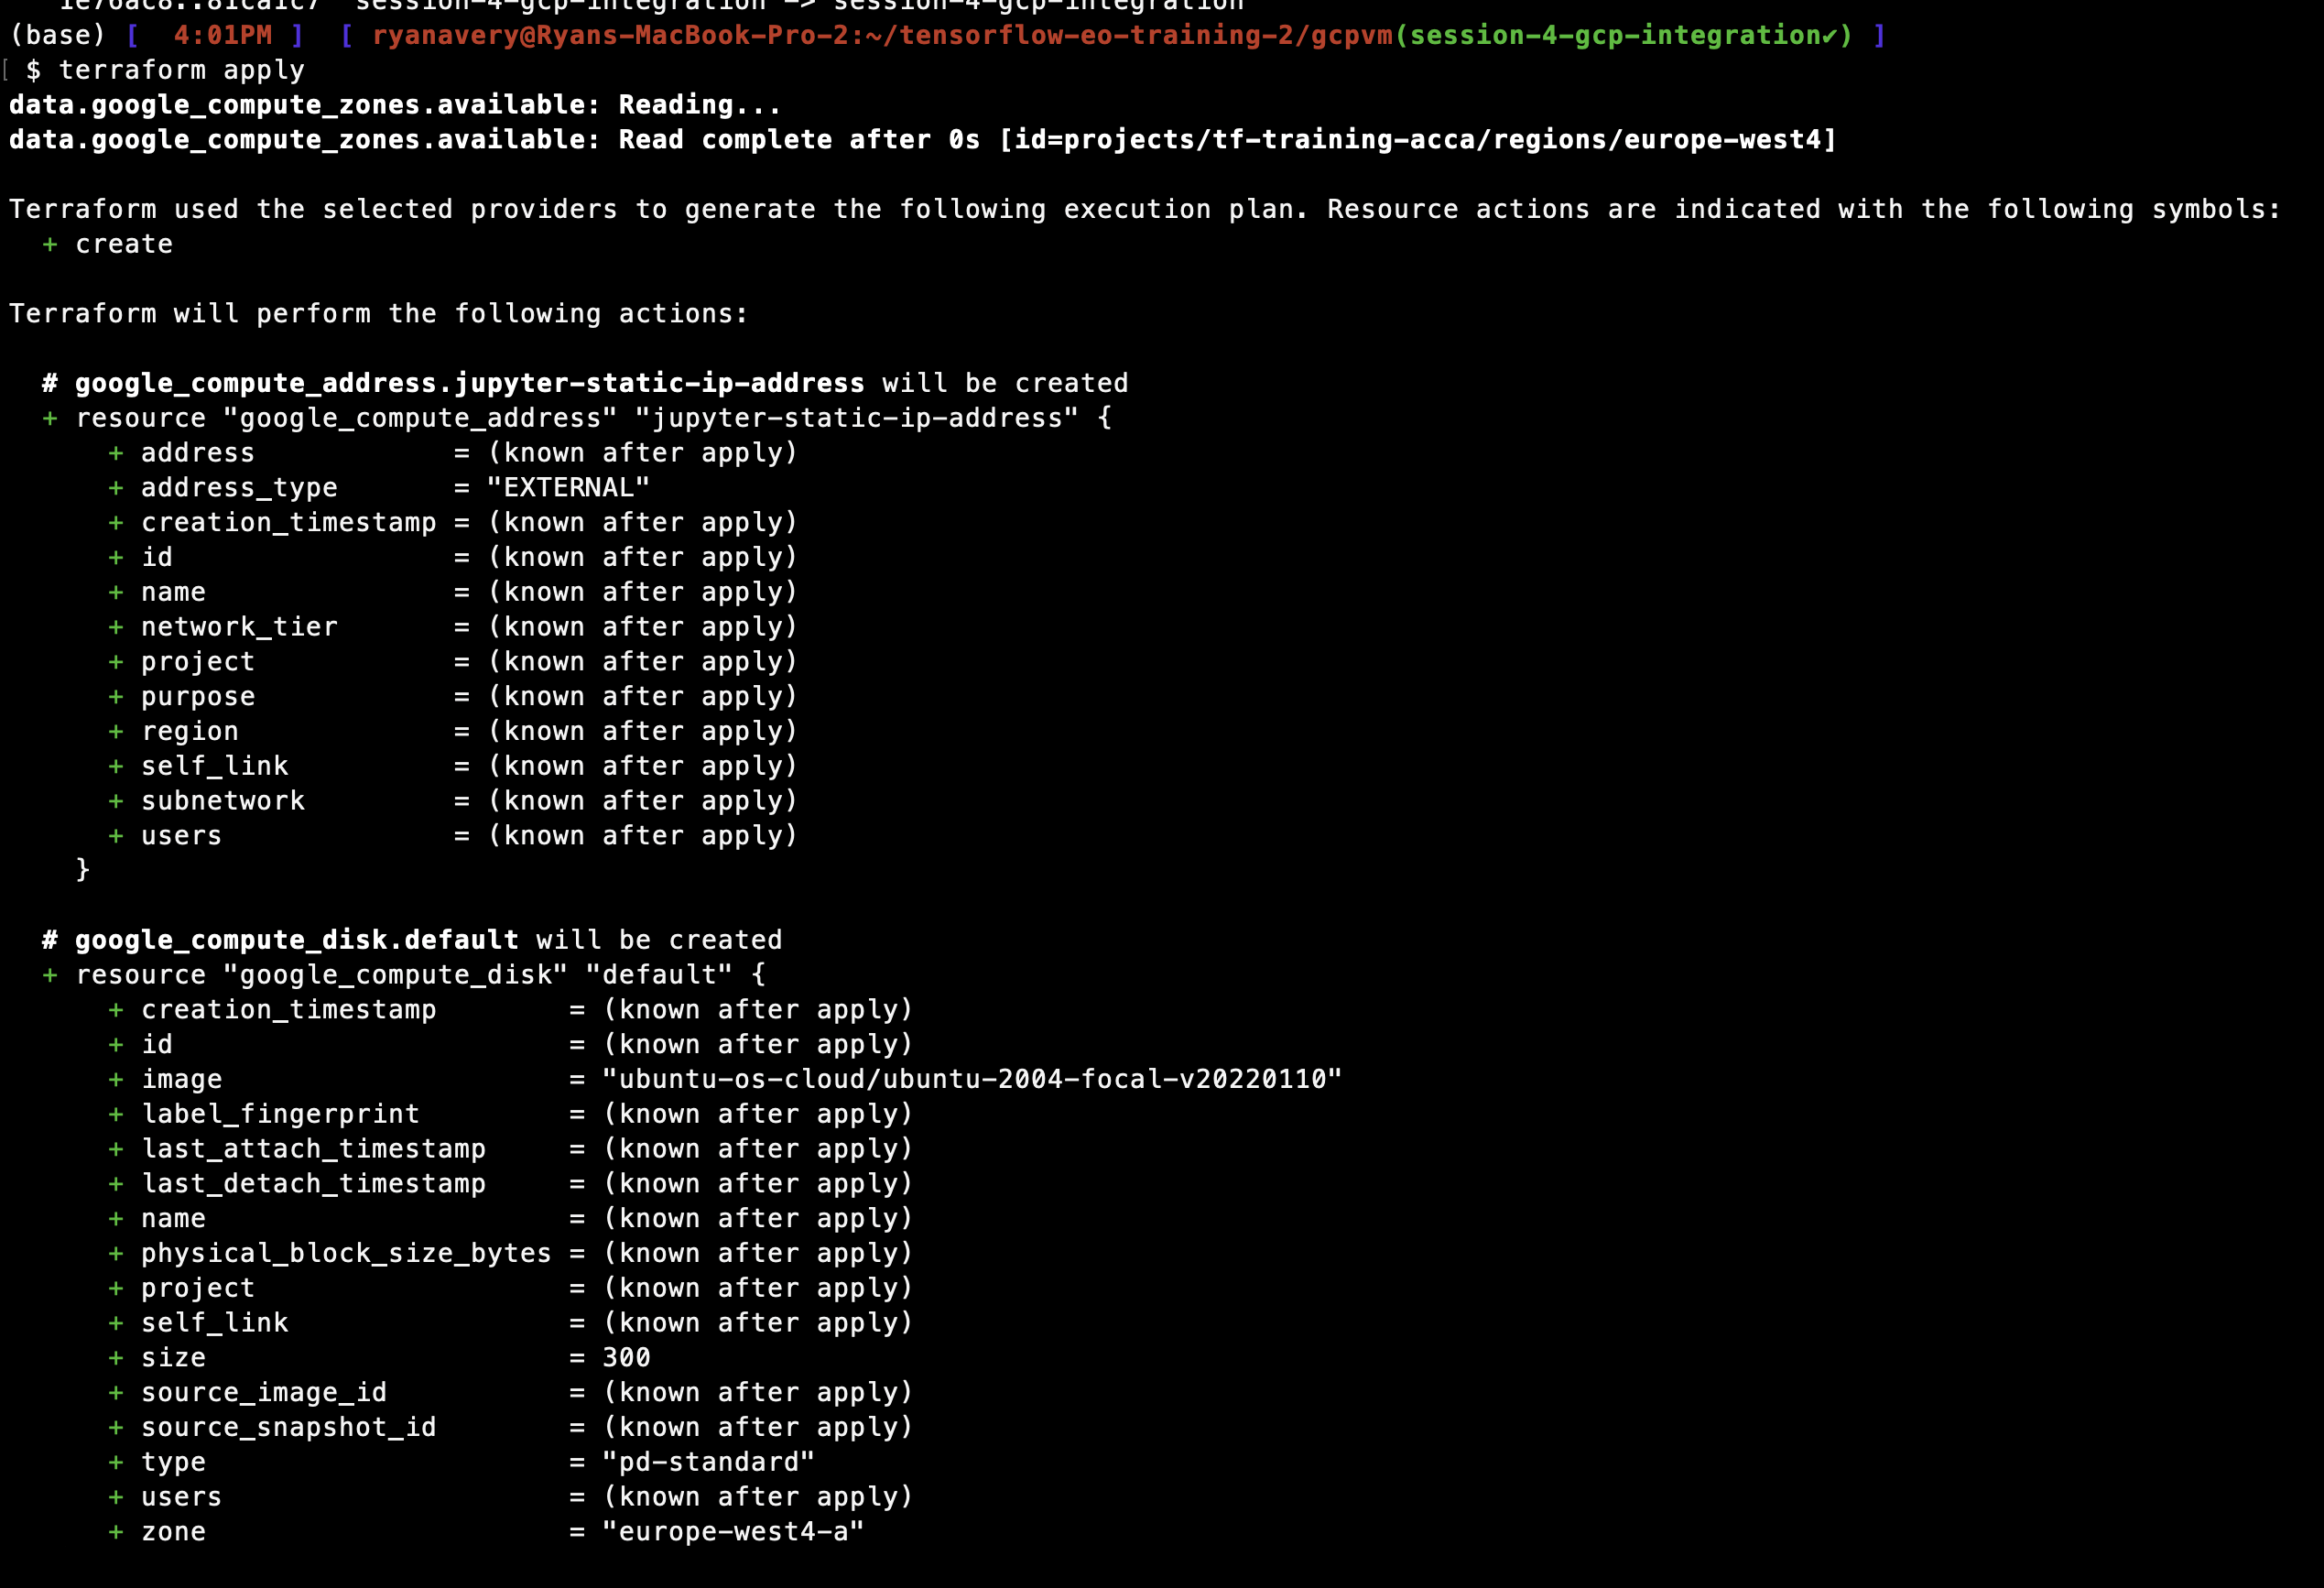
When you are done with the VM, run
terraform destroyto remove all resources so you don’t pay for them. Runmake stopto stop the VM but persist the disk space so that you only pay for storing resources, which is much less expesnive than the cost of running the VM (1-3 US dollars per hour for a GPU).
terraform apply will create the ML workstation, including reserved disk space, static ip addresses that allow you to access the instance from anywhere with a wifi connection, the VM with CPU or GPU, etc. Each of these resources has a variety of properties. In particular for ML development, it’s important to pay attention to RAM, disk size, CPU/GPU type, the compute region. Make sure the compute region for the VM is close to the cloud data bucket for fast read/write!
Note: If you are creating a project from scratch, you may need to request Google Cloud to increase your quota so you can create GPU VMs. It is 0 by default for new projects. To do so,
Navigate to https://console.cloud.google.com/iam-admin/quotas and make sure you have the correct project selected in the console.
Select the following text in the “Filter” search box to find the correct resource to request a quota for: “GPUs All Regions”
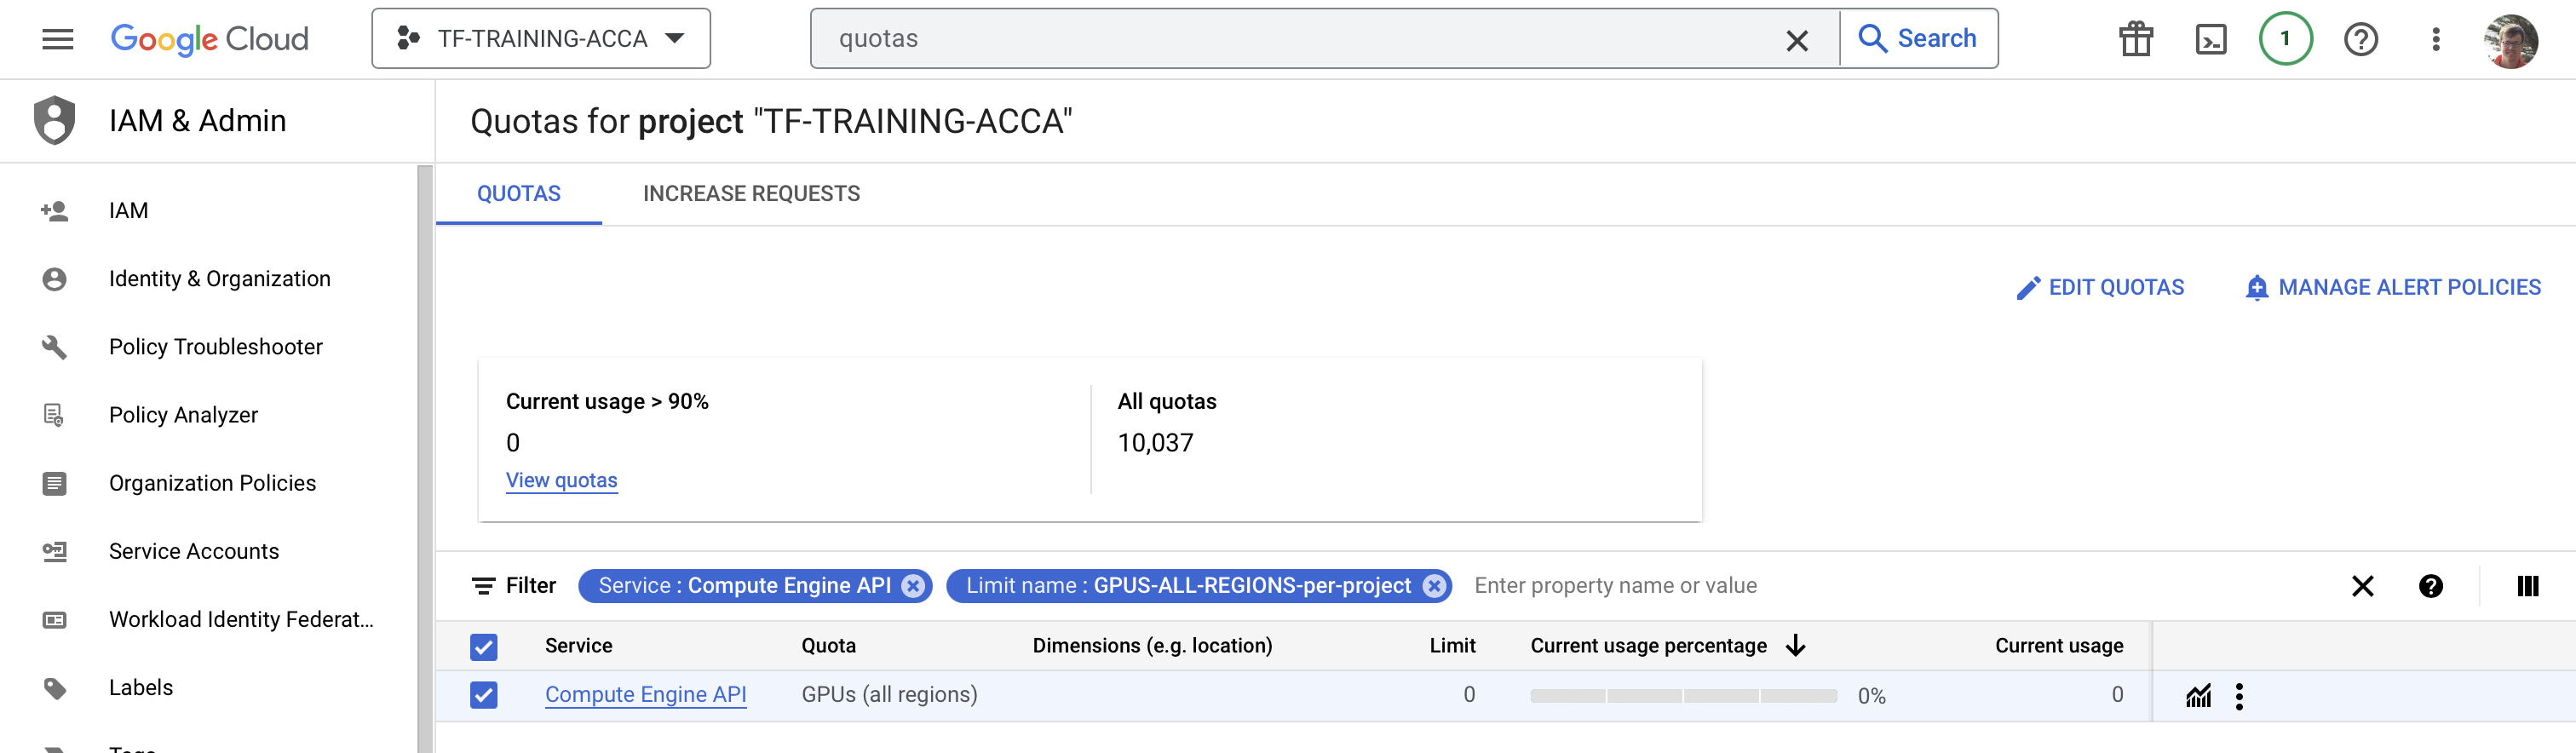
Go to “Edit Quotas” after checking the box next to the Filter result “Compute Engine API” and increase the limit from 0 to 1. Submit the required info and wait for an email that says the request has been processed. It should look something like:
Hello,
Your quota request for tf-training-acca has been approved and your project quota has been adjusted according to the following requested limits:
+——————+————+——–+—————–+—————-+
| NAME | DIMENSIONS | REGION | REQUESTED LIMIT | APPROVED LIMIT |
+——————+————+——–+—————–+—————-+
| GPUS_ALL_REGIONS | | GLOBAL | 1 | 1 |
+——————+————+——–+—————–+—————-+
After approved, Quotas can take up to 15 min to be fully visible in the Cloud Console and available to you.
Configuring Terraform to change deployment parameters#
We can control the most frequently edited variables for our VM using the terraform.tfvars file
instance-type = "n1-standard-8" # "n1-standard-8" is a good default. only n1 types can add gpus https://stackoverflow.com/questions/53968149/add-gpu-to-an-existing-vm-instance-google-compute-engine
gpu-count = 1
gpu-type  = "nvidia-tesla-t4" # https://cloud.google.com/compute/docs/gpus/gpu-regions-zones alternative GPU options for europe-west4
location  = "us-west4"
zone      = "us-west4-b"
Important
Not all GPU types are available in all zones. And not all GPU types have equal capabilities. See this list for supported GPU types by zone: https://cloud.google.com/compute/docs/gpus/gpu-regions-zones In particular, southamerica zones only support the old T4 GPU type. other zones in asia, europe, north america, us-west, and us-east support other GPU types.
We can control our VM once it is deployed using the commands defined in the Makefile.
# sync code
syncup:
	ssh -i ${PATH_SSH_KEY} -o IdentitiesOnly=yes ${VM_CONN} "mkdir -p ${REMOTE_DIR}/"
	rsync -e "ssh -i ${PATH_SSH_KEY} -o IdentitiesOnly=yes" -avz --exclude=".git/" --exclude-from=${LOCAL_DIR}.gitignore ${LOCAL_DIR} $(shell echo ${VM_CONN}:${REMOTE_DIR}/ | tr -d '[:space:]')
syncdown:
	rsync -e "ssh -i ${PATH_SSH_KEY} -o IdentitiesOnly=yes" -avz --exclude=".git/" --exclude-from=${LOCAL_DIR}.gitignore $(shell echo ${VM_CONN}:${REMOTE_DIR}/ | tr -d '[:space:]') ${LOCAL_DIR}
# start/stop instance. the --filter step saves us from needing to provide the specific zone to the gcloud commands but requires
# different names for instances in different zones.
stop:
	gcloud compute instances stop ${VM_NAME_ZONE}
start:
	gcloud compute instances start $(VM_NAME_ZONE)
status:
	gcloud compute instances describe ${VM_NAME_ZONE}

# ssh into machine with jupyter lab port forwarded
ssh:
	ssh -i ${PATH_SSH_KEY} -L 8888:localhost:8888 -L 6006:localhost:6006 -L 8787:localhost:8787 -o IdentitiesOnly=yes ${VM_CONN}
Summary#
You’re well on your way to developing models in the cloud and understanding how to deploy them in complex, user-facing applications!
The big take-away here is that we can use Infrastructure-as-code tools like Terraform and Pulumi to define in code files what infrastructure to create on the cloud. We can do this for both our data science/model development environment or for larger applications.
This makes it easier to reproduce, redeploy, and edit infra. There are many online resources out there to learn more about Terraform, Pulumi, and other cloud-specific infrastructure-as-code tools.