
Introduction to Google Colab#
Here we will cover the main components of Google Colab as they relate to this training session. You can learn more by visiting https://colab.research.google.com/notebooks/basic_features_overview.ipynb.
Cells#
Google Colab is built upon Jupyter notebooks and comes packaged with a lot of built in Python syntax. This is a notebook, which in and of itself is a set of cells. Any given cell will contain either explanatory text or executable code.
To ensure the notebook is connected to a runtime, click Connect in the upper righthand corner of the notebook. You can switch the runtime type (e.g. to use TPU) by right clicking again and selecting View resources then in the pane, choosing Change runtime type.
Code cells#
It is best practice to break down a body of code into bite size pieces. For example, a function should reside in its own cell, as should a list of imports. This helps ensure readability and error isolation. It also helps build in modularity to our code. We can more easily swap methods when it is broken down into key components.
Below is a code cell that contains a list of a few imports. Select the cell and execute the content in the it by clicking the Play icon in the left of the cell.
See the Runtime menu for additional options to run some or all cells.
import numpy as np
import matplotlib.pyplot as plt
Text cells#
Just as we break down a cody of code into bite size peices, we decorate the code with explanatory text cells, such as this one. This cell can be edited by double-clicking on it. We use markdown syntax in text cells. To learn more about markdown, see this guide.
Text cells are useful for explaining the context or rationale for an adjacent code cell. We can use them to guide usage, reference sources, suggest alternatives and/or flag certain scenarios such as “the next cell contains long-running code.”
System aliases#
Jupyter includes command-line style shortcuts for common operations, such as ls:
!ls
That !ls listed the contents of the current working directory. To clear the output produced by the cell, either:
Click on the (x) in the left of the cell output; or
Right click on output and select “Clear output” from the menu.
Execute processes such as this using !.
Automatic completions and exploring code#
Colab provides automatic completions which help us unpack and discover attributes of Python objects. They also are useful for accessing documentation strings. As an example, let’s take a look at the attributes of the numpy module.
We imported numpy earlier so now, so now we can obtain available methods (which can be auto-completed) by typing Period(.) after np.
np
To see a documentation string, you can type an open parenthesis after a method of the module. Note that you can get a perisstent view of the documentation string by hovering over the method name and selecting the Open in tab link. Similarly, we can access the source code for the method by clicking the View source link.
np.ndarray
Rich, interactive outputs#
We can generate types of output other than simple alphanumeric. Take for example an interactive map.
from folium import Map, GeoJson, Figure
m = Map(tiles="Stamen Terrain",
        control_scale=True,
        location = [-12.046329, -77.042755], # Lima, Peru
        zoom_start = 10,
        max_zoom = 20,
        min_zoom =10,
        width = '100%',
        height = '100%',
        zoom_control=False )
Figure(width=500, height=300).add_child(m)
Integration with Drive#
In colab, we can host data natively on Google Drive and read from it in a file system style after mounting the Drive volume.
Some of the operations we’ll be running throughout the following tutorials, particularly model training, take prohibitively long when using Google Colab because the storage backend, Google Drive, has slow IO.
So in some spots we’ll use pre-computed files from the tf-eo-devseed-processed-outputs and tf-eo-devseed-2-processed-outputs Google Drive folders, which you can create a shortcuts to by navigating to these respective links:
https://drive.google.com/drive/folders/1bwW3RV8-Lt9eCB3QDD2d6g9hbaQWmppc?usp=sharing
https://drive.google.com/drive/folders/1FrSTn9Iq458qQhTw_7rbaVSc739TTw9V?usp=sharing
Adding a shortcut to your Google Drive file system allows for you to read data from these folders. You’ll only have to create a folder to write user-generated outputs to during this training, tf-eo-devseed-2-user_outputs_dir, which we will do below.
To create a shortcut:
Click the link
Click the drop down for the folder
Select
OrganizeSelect
Add shortcutSelect
All locationsSelect
My Drive
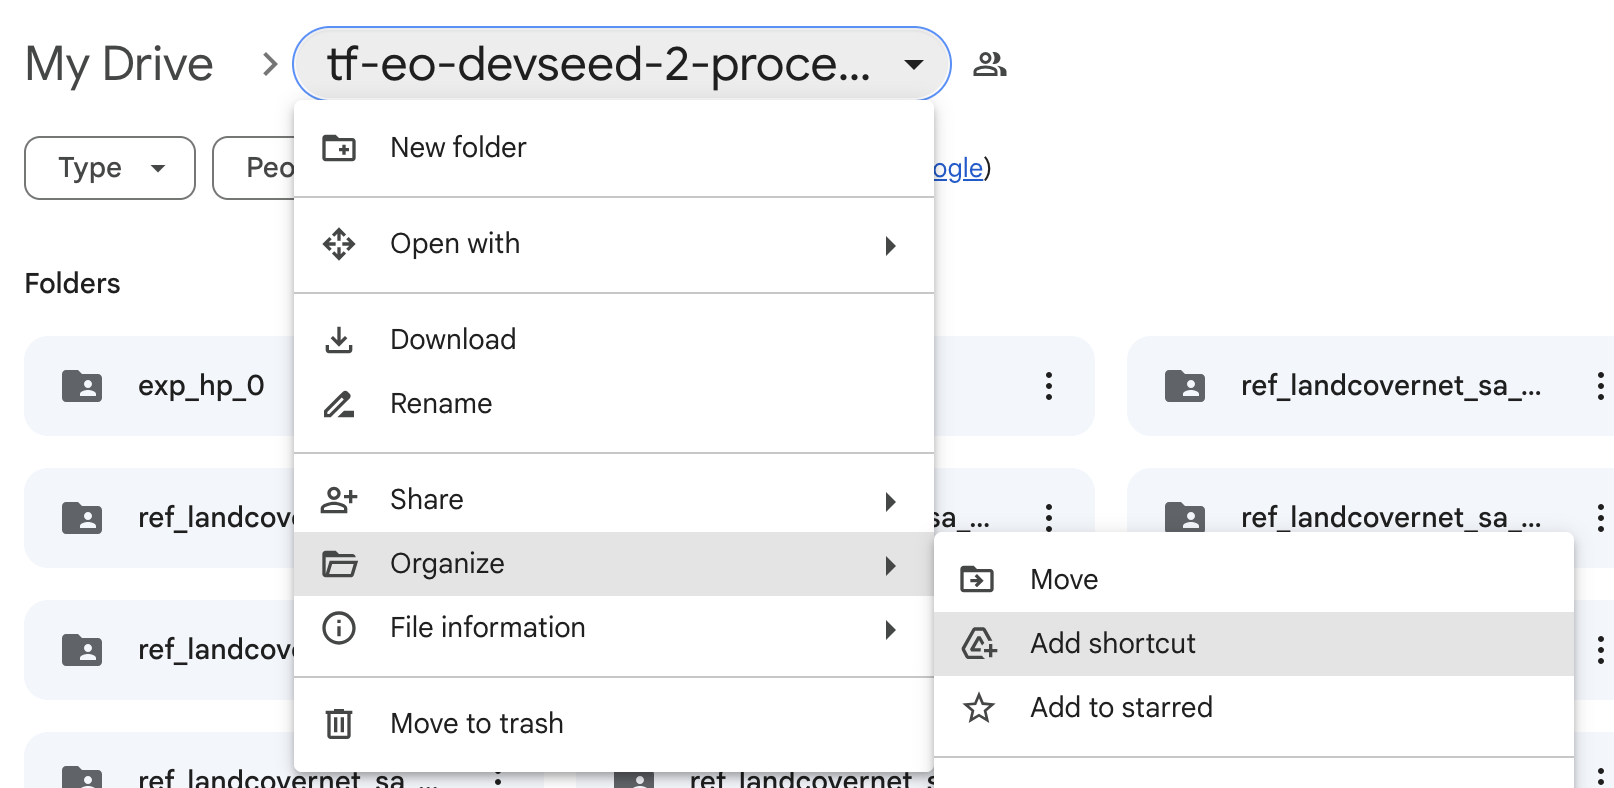
Fig. 17 Shortcut part 1#
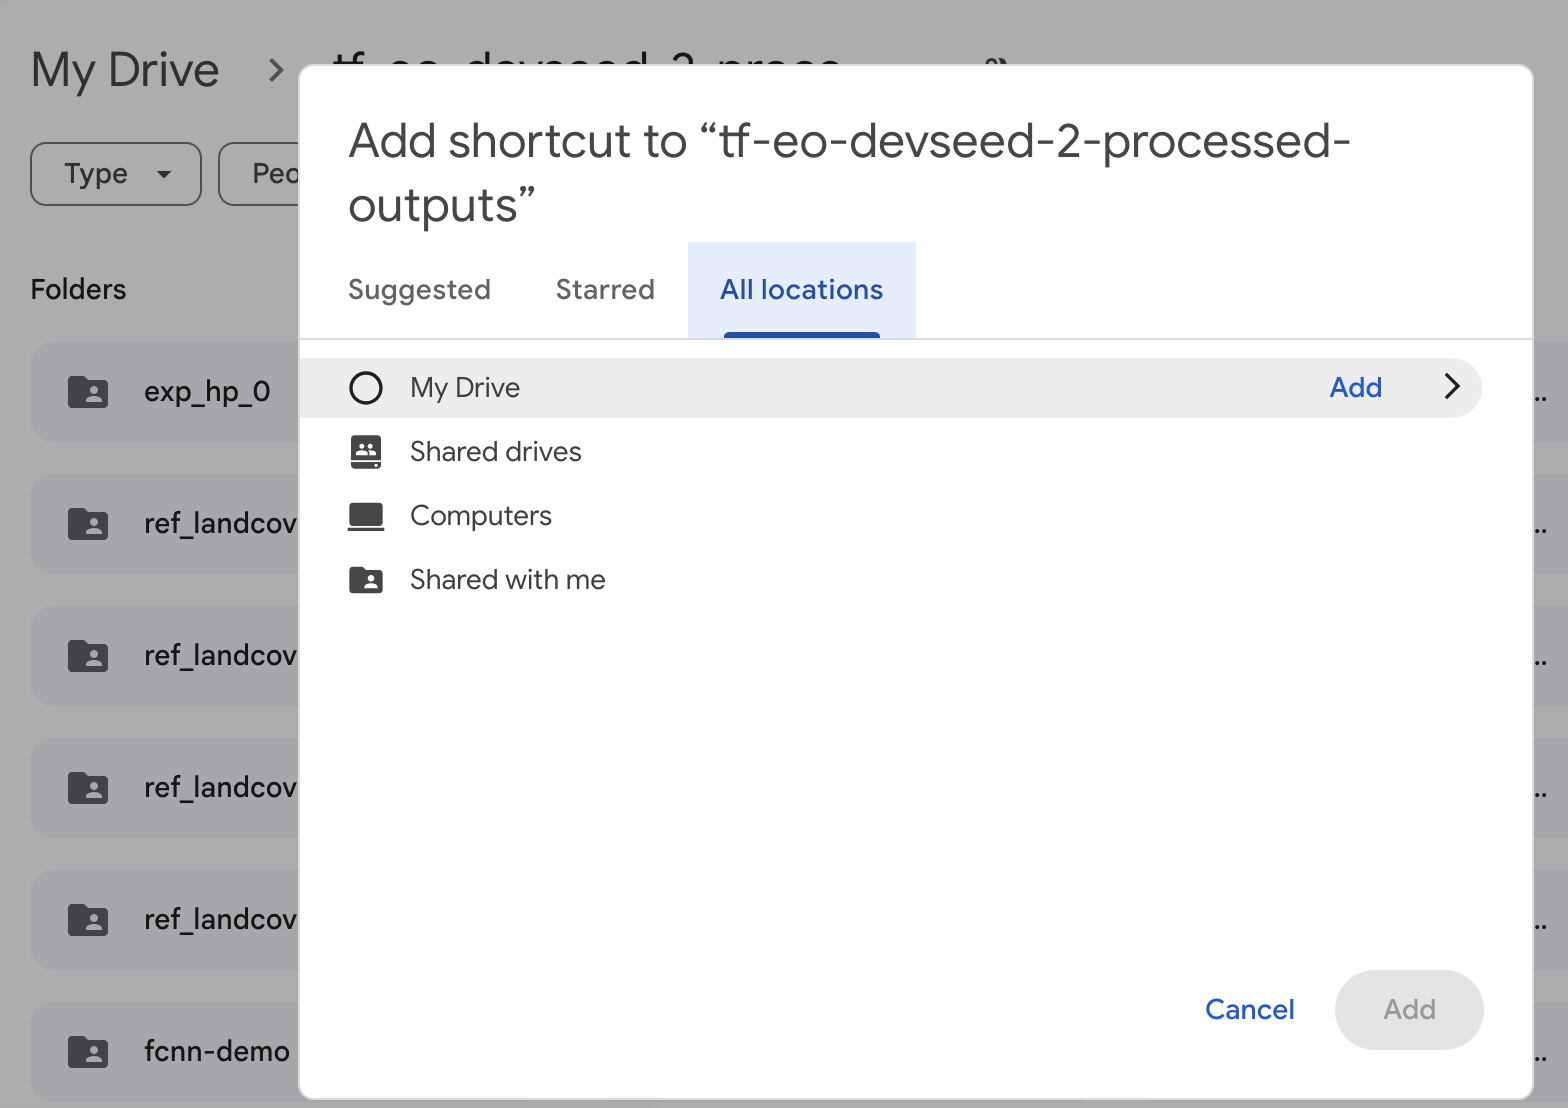
Fig. 18 Shortcut part 2#
You will then be able to read from these folders. Make sure to do this process for both shared folders.
import os
from google.colab import drive

if 'google.colab' in str(get_ipython()):
    # mount google drive
    drive.mount('/content/gdrive')
    processed_outputs_dir = '/content/gdrive/My Drive/tf-eo-devseed-2-processed-outputs/'
    user_outputs_dir = '/content/gdrive/My Drive/tf-eo-devseed-2-user_outputs_dir'
    if not os.path.exists(user_outputs_dir):
        os.makedirs(user_outputs_dir)
    print('Running on Colab')
else:
    processed_outputs_dir = os.path.abspath("./data/tf-eo-devseed-2-processed-outputs")
    user_outputs_dir = os.path.abspath('./tf-eo-devseed-2-user_outputs_dir')
    if not os.path.exists(user_outputs_dir):
        os.makedirs(user_outputs_dir)
        os.makedirs(processed_outputs_dir)
    print(f'Not running on Colab, data needs to be downloaded locally at {os.path.abspath(processed_outputs_dir)}')
Notebook sharing#
We can share the same notebook with multiple people:
Share the notebook and control permissions using the SHARE button (top-right of the toolbar).
Create a copy of the notebook in Drive using File->Make a Copy.